Kubernetes
*Shreyash Bhise | Aspiring Mern Stack Developer and DevOps enthusiast,
Docker Vs Kubernetes:
Docker:
Single Host
Docker do not provide auto scaling
Docker do not provide auto healing
Docker does not provide Enterprise level support
Kubernetes:
Bydefault kubernetes is a Cluster
Replication Controller Using this we have achieved a feature called auto scaling.
Kubernetes Controller Using this we have achieved a feature called auto healing.
Kubernetes offers multiple enterprise support
Note: Docker is a container tool and kubernetes acts as an orchestrator.
Orchestrator:
Basically helps us deploying and managing application dynamically.
Help us in deploying and managing containers dynamically.
Deploy
Zero downtime updates
Self Healing
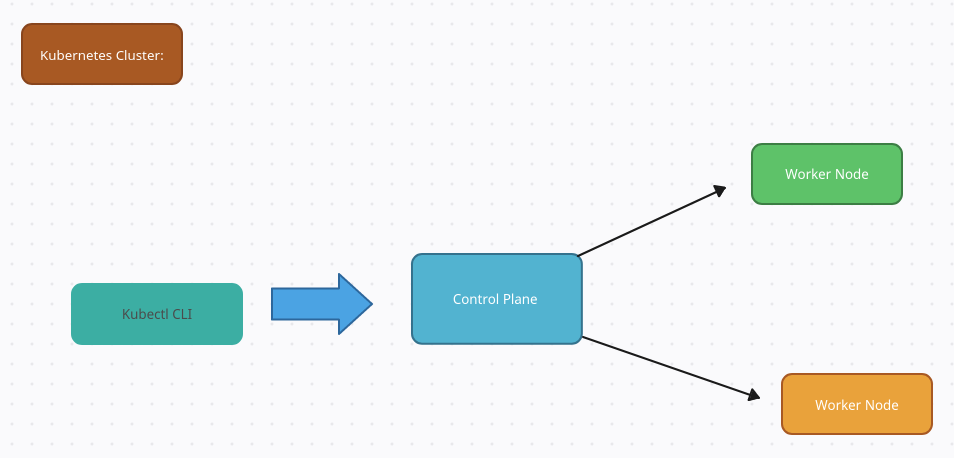
Kubernetes Cluster: It's just a collection of worker nodes and the control plane which was previously known as master node.
Worker Node: Worker node is the place where your application will be running.
Control Plane: Control plane is actually going to manage the worker nodes.
Kubectl : Kubectl is the kubernetes cli command line tool. Kubectl will communicate with the control plane.
You can interact with using like two ways:
Declarative Way: Basically we create manifest files you write yaml files you write code in the yaml files give it that then it happens.
Imperative Way: Imperative way is something like you're telling your cluster for some specific command and stuff.
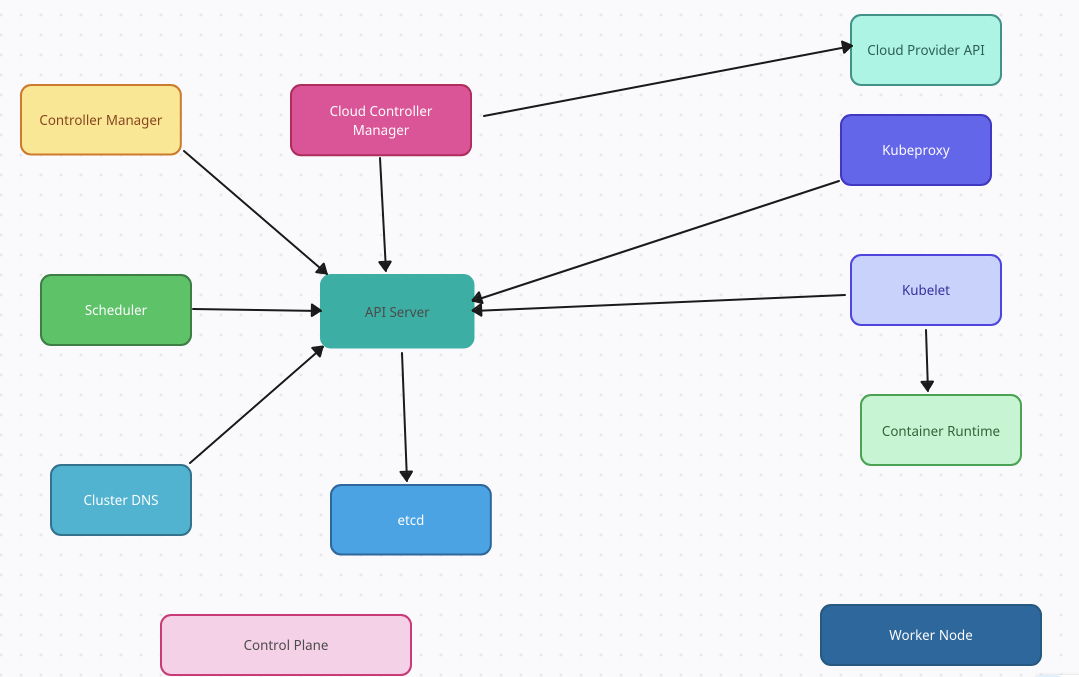
Kubernetes is a powerful container orchestration platform that helps manage the deployment, scaling, and operation of containerized applications. Its architecture is designed to provide high availability, scalability, and flexibility. Here's an overview of the key components and concepts in the Kubernetes architecture:
Cluster: A Kubernetes cluster is a collection of nodes (servers or virtual machines) that run containerized applications. Clusters can consist of a varying number of nodes, which can be divided into two main types:
Master Node: The master node is responsible for managing the overall state of the cluster and making global decisions about scheduling and scaling. It hosts various control plane components that handle cluster management tasks.
Worker Node: Worker nodes, also known as minion nodes, are where the actual containers are scheduled and run. Each worker node hosts a runtime environment (like Docker or another container runtime) and is managed by the master node.
Control Plane: The control plane is the brain of the Kubernetes cluster, responsible for managing and controlling the cluster's state. It consists of several components:
API Server: The API server exposes the Kubernetes API, which allows users and external tools to interact with the cluster. All administrative tasks are managed through the API server.
etcd: etcd is a distributed key-value store that stores the configuration and state of the entire cluster. The control plane components use etcd to store their data and ensure consistency.
Scheduler: The scheduler is responsible for placing containers onto available worker nodes based on resource requirements, constraints, and other policies.
Controller Manager: The controller manager runs various controllers that monitor and control the state of different parts of the cluster. For example, the ReplicaSet controller ensures a desired number of replicas of a particular pod are always running.
Cloud Controller Manager: If the cluster is running on a cloud provider's infrastructure, the cloud controller manager interacts with the provider's API to manage resources like load balancers, storage volumes, and instances.
Nodes: Nodes are the worker machines that run containers. Each node is managed by the master node and can host multiple pods. Key components on each node include:
Kubelet: The kubelet is responsible for ensuring that containers in a pod are running in a healthy state. It communicates with the master node and takes actions based on pod specifications.
Container Runtime: This is the software responsible for running containers. Docker is a common choice, but other runtimes like containerd or CRI-O can also be used.
Kube Proxy: The kube proxy maintains network rules to allow network communication between different pods and services within the cluster.
Pods: The smallest deployable unit in Kubernetes is a pod. A pod can host one or more containers that share the same network namespace, storage, and context. Containers in a pod are tightly coupled and often work together as part of a single application.
Services: Kubernetes services provide a way to expose pods to the network. Services allow for load balancing and automatic discovery of pods, even as they are created or terminated.
Volumes: Volumes are used to provide persistent storage for pods. They allow data to be shared and persisted across pod restarts.
Labels, Selectors, and Annotations: Labels and selectors are used to organize and categorize resources like pods, nodes, and services. Annotations provide additional metadata to resources.
Docker Engine is a comprehensive containerization platform that includes the Docker Container Runtime as one of its components.
The Docker Container Runtime (within Docker Engine) is responsible for running containers created with Docker commands.
containerd is a standalone, industry-standard container runtime that can be used independently or as a component within various containerization solutions.
This is a high-level overview of the Kubernetes architecture. It's a complex system with many more features and components designed to provide a robust platform for deploying and managing containerized applications at scale.
As of my last update in September 2021, DockerShim, also known as dockershim, was a component used to bridge the communication between Kubernetes and the Docker runtime. It acted as an adapter that allowed Kubernetes to interact with Docker using its internal APIs.
However, it's important to note that DockerShim was deprecated in Kubernetes 1.20 and was planned to be removed in future releases. This decision was driven by the Kubernetes community's efforts to streamline and simplify the Kubernetes codebase and focus on supporting the Container Runtime Interface (CRI) standard.
The deprecation of DockerShim meant that Kubernetes was moving away from tightly coupling to specific container runtimes like Docker and encouraging the use of the CRI for runtime interaction. This change aimed to make Kubernetes more flexible and to allow support for various container runtimes beyond just Docker.
As a result of this deprecation, Kubernetes users were encouraged to transition to using the CRI-compatible runtimes directly, such as containerd, CRI-O, and others, as these runtimes provided a standard and well-defined interface for Kubernetes to manage containers.
Given that my information is based on updates available until September 2021, I recommend checking the latest Kubernetes documentation or community resources to verify the current status of DockerShim and any related developments since that time.
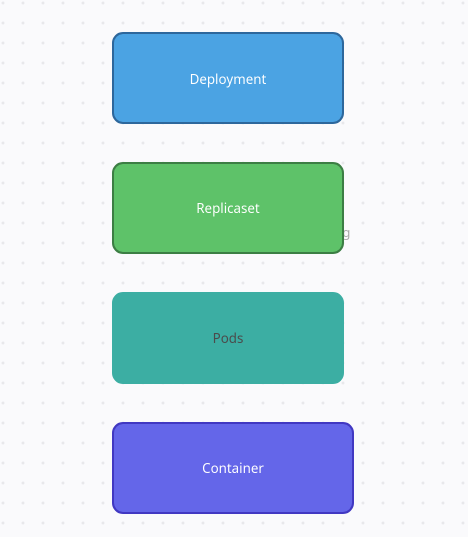
In Kubernetes, "container," "pod," and "deployment" are fundamental concepts that relate to how applications are managed and orchestrated within the cluster. Let's delve into the differences between these terms:
Container: A container is a lightweight, standalone, and executable software package that includes everything needed to run a piece of software, including the code, runtime, libraries, and system tools. Containers provide isolation, making it possible to run applications consistently across different environments. Common container runtimes are Docker, containerd, and CRI-O.
Pod: A pod is the smallest deployable unit in Kubernetes. It represents a logical group of one or more containers that share the same network namespace, storage, and IP address. Containers within a pod can communicate with each other using localhost. Pods are often used to deploy tightly coupled applications or microservices that need to share resources and communicate closely. However, pods are considered relatively ephemeral and can be replaced or rescheduled by Kubernetes.
ReplicaSet: A ReplicaSet is a resource that ensures a specified number of replicas (identical copies) of a pod are running at all times. It's often used to guarantee the availability and scalability of pods. However, ReplicaSets are relatively low-level and don't support rolling updates or rollbacks directly.
Deployment: A deployment is a higher-level abstraction in Kubernetes that manages the lifecycle and scaling of a set of pods. Deployments are used to ensure that a desired number of replica pods are always running, and they handle updates and rollbacks seamlessly. Deployments also provide declarative configuration, which means you define the desired state of your application, and Kubernetes works to maintain that state.
Here's a breakdown of the key differences:
Container: A single executable software package that encapsulates an application and its dependencies.
Pod: A logical group of one or more containers that share the same network and storage context, often used for co-locating closely related components.
Deployment: A higher-level resource that manages the deployment and scaling of pods, providing features like rolling updates, rollbacks, and declarative configurations.
In practice, a deployment typically manages the lifecycle of pods by creating and updating them as needed, while each pod contains one or more containers that work together to provide a specific application or service. The use of these concepts allows Kubernetes to provide a powerful platform for deploying and managing containerized applications at scale.
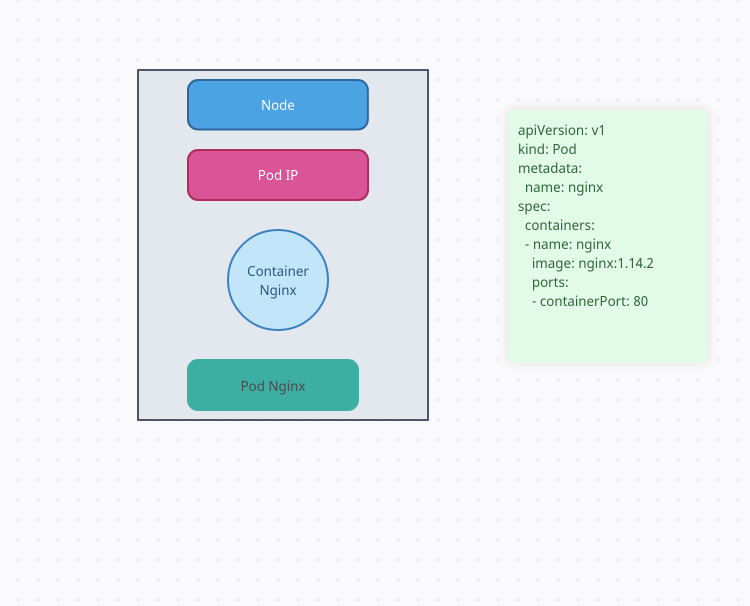
In Kubernetes, "container," "pod," and "deployment" are fundamental concepts that relate to how applications are managed and orchestrated within the cluster. Let's delve into the differences between these terms:
Container: A container is a lightweight, standalone, and executable software package that includes everything needed to run a piece of software, including the code, runtime, libraries, and system tools. Containers provide isolation, making it possible to run applications consistently across different environments. Common container runtimes are Docker, containerd, and CRI-O.
Pod: A pod is the smallest deployable unit in Kubernetes. It represents a logical group of one or more containers that share the same network namespace, storage, and IP address. Containers within a pod can communicate with each other using localhost. Pods are often used to deploy tightly coupled applications or microservices that need to share resources and communicate closely. However, pods are considered relatively ephemeral and can be replaced or rescheduled by Kubernetes.
Deployment: A deployment is a higher-level abstraction in Kubernetes that manages the lifecycle and scaling of a set of pods. Deployments are used to ensure that a desired number of replica pods are always running, and they handle updates and rollbacks seamlessly. Deployments also provide declarative configuration, which means you define the desired state of your application, and Kubernetes works to maintain that state.
Here's a breakdown of the key differences:
Container: A single executable software package that encapsulates an application and its dependencies.
Pod: A logical group of one or more containers that share the same network and storage context, often used for co-locating closely related components.
Deployment: A higher-level resource that manages the deployment and scaling of pods, providing features like rolling updates, rollbacks, and declarative configurations.
In practice, a deployment typically manages the lifecycle of pods by creating and updating them as needed, while each pod contains one or more containers that work together to provide a specific application or service. The use of these concepts allows Kubernetes to provide a powerful platform for deploying and managing containerized applications at scale.
Containers: Containers are the primary components within a Pod. Each container runs a specific process or application and includes everything needed to run that process, such as the runtime, libraries, and application code.
Pod IP Address: Each Pod is assigned a unique IP address within the cluster. This IP is used for communication between Pods within the same cluster. Containers within a Pod can communicate with each other using
localhostor the Pod's IP.Shared Storage (Volumes): Containers within a Pod can share storage volumes, which allow them to read and write data to the same storage location. Volumes are used to share files, configuration, or data between containers within the same Pod.
Pod Namespace: Kubernetes uses namespaces to create a logical separation between different environments or projects within a cluster. Pods are created within specific namespaces to help manage and isolate resources.
Pod Labels and Selectors: Labels are key-value pairs attached to Pods to provide metadata and categorization. Selectors are used to identify Pods based on labels, allowing for targeted actions such as routing traffic or applying policies.
Pod Annotations: Annotations are additional metadata that can be attached to Pods. Unlike labels, annotations are not used for selection or querying but can store auxiliary information like build timestamps or configuration details.
Pod Affinity and Anti-Affinity: Affinity and anti-affinity rules specify how Pods should be scheduled in relation to other Pods. This helps control Pod placement to achieve desired behaviors, such as co-locating or avoiding certain Pods on the same node.
Init Containers: Init containers are additional containers that run before the main containers in a Pod. They are used for tasks like pre-configuration, setting up data, or ensuring dependencies are available before the main application starts.
Resource Requests and Limits: You can define resource requests (minimum resources needed) and limits (maximum resources allowed) for each container within a Pod. This helps with resource allocation and cluster optimization.
Pod Lifecycle: Pods have a lifecycle that includes phases like "Pending," "Running," "Succeeded," or "Failed." Kubernetes manages the transition between these phases based on events like container startup, readiness checks, and completion status.
Termination Grace Period: When a Pod is deleted, Kubernetes follows a termination grace period during which containers within the Pod are allowed to shut down gracefully. This helps avoid abrupt terminations and data loss.
Pod Security Context: Pod security context settings define security-related aspects for the Pod, such as the user and group IDs, filesystem permissions, and privileges.
Pod Probes: Probes are mechanisms for checking the health of containers within a Pod. Liveness probes determine if a container is healthy, readiness probes indicate if a container is ready to receive traffic, and startup probes determine when a container is ready to serve requests.
Kubernetes provides a rich set of features and configurations for managing Pods, allowing you to build resilient, scalable, and reliable applications. While Pods are important building blocks, higher-level abstractions like Deployments and StatefulSets often manage the creation and scaling of Pods more effectively.
The lifecycle of a Kubernetes Pod consists of several phases, from its creation to termination. Understanding these phases helps you manage and troubleshoot your applications effectively. Here's a breakdown of the different phases in a Pod's lifecycle:
Pending: The Pending phase occurs when a Pod is created, but one or more of its containers are not yet running. The Pod's resources are being allocated, and Kubernetes is working to schedule the Pod onto a suitable node. Pods can be in this phase due to resource constraints, node affinity rules, or other scheduling factors.
Container Creating: Once a node is assigned to the Pod, the containers within the Pod move to the "Container Creating" phase. At this stage, the container runtime (e.g., Docker, containerd) is setting up the container's filesystem, environment, and other configurations. This phase is usually very short.
Running: In the Running phase, all the containers within the Pod are up and running, and the Pod is serving its intended purpose. If there are multiple containers in the Pod, they are typically designed to work together as part of a single application.
Succeeded: If a container within the Pod completes its task successfully and terminates, the Pod transitions to the Succeeded phase. The Pod remains in this phase until it's cleaned up manually or through automated processes.
Failed: If a container within the Pod fails to start or exits with an error code, the Pod enters the Failed phase. This indicates that the Pod's main purpose could not be achieved. Kubernetes does not automatically restart Pods in the Failed phase; you typically need to investigate and resolve the underlying issue.
Unknown: The Unknown phase occurs if Kubernetes cannot determine the status of a Pod, usually due to communication issues between the control plane and the node. This phase is rare and often temporary.
Terminating: When a Pod is being deleted or terminated, it enters the Terminating phase. During this phase, Kubernetes sends termination signals to the containers, allowing them to shut down gracefully. The Termination Grace Period is applied, giving the containers time to clean up and exit before the Pod is removed.
Terminated: The Terminated phase indicates that all containers within the Pod have terminated. The Pod's resources have been released, and the Pod object still exists in the cluster. The terminated Pod can be inspected for logs or troubleshooting purposes.
It's important to note that Kubernetes maintains the desired state of Pods, ensuring that if a Pod fails or is terminated, it is automatically replaced by a new Pod according to its configuration, especially when managed by controllers like Deployments or StatefulSets.
- A stateful application is a type of software application that maintains information or state data about the user or its environment across multiple interactions or sessions.
Examples of stateful applications include:
E-commerce Platforms: These applications remember user shopping carts, order histories, and user profiles across sessions.
Social Media Platforms: Social media applications maintain user profiles, friend lists, timelines, and messaging histories.
Online Games: Online games store player progress, achievements, and game state, allowing players to pick up where they left off.
Collaborative Tools: Applications like project management tools or collaboration platforms store project data, user roles, and collaboration history.
Databases: Database management systems are inherently stateful as they store and manage structured data that retains its state over time.
Statefulset: A Statefulset is a kubernetes controller that manages deployment and scaling of stateful application. It provides ordered,unique network identities, and stable storage for each pod instance.
stable, unique network identifiers
stable, persistent storage
When a Pod managed by a StatefulSet is deleted, Kubernetes does not create a new Pod with the same name. Instead, it retains the name and ordinal index of the Pod, which remains stable and unchanged even after deletion. This is one of the key characteristics of StatefulSets: the stability of Pod identities.
Here's how it works:
Let's say you have a StatefulSet with three replicas named
web-0,web-1, andweb-2.If you delete
web-1, Kubernetes does not create a new Pod namedweb-1to replace it.Instead, the StatefulSet retains the name
web-1, and if you decide to create a new Pod with that name later, it will be given the same identity, including the nameweb-1and its ordinal index.This stable identity is crucial for applications like databases where the Pod's hostname or network address must remain consistent.
So, in summary, when a Pod managed by a StatefulSet is deleted, its identity (name and ordinal index) is retained, but a new Pod is not automatically created in its place. You have the option to manually create a new Pod with the same identity if needed.
In Kubernetes, a "Service" is an abstraction that provides a way to expose a set of pods as a network service. Services enable communication between various components within the cluster, as well as external clients. Services are a fundamental building block for networking in Kubernetes, and they play a crucial role in enabling microservices architectures and load balancing.
Here's everything you need to know about Kubernetes Services:
Types of Services: Kubernetes supports several types of services, each with a specific use case:
ClusterIP: The default service type, provides a stable internal IP to access pods within the same cluster.
NodePort: Exposes the service on a static port on each node's IP, making it accessible externally.
LoadBalancer: Automatically provisions an external load balancer (if supported by the cloud provider) to expose the service externally.
ExternalName: Maps the service to a DNS name, allowing pods to access external services using that name.
Headless: Similar to ClusterIP but with no load balancing or proxying, useful for StatefulSets.
Selectors and Endpoint Discovery: Services use label selectors to match a set of pods. The service then creates a virtual IP and port, and maintains a dynamic list of endpoints (Pod IPs and ports) that match the selector. This endpoint list is updated as pods come and go.
Service Discovery: Services enable a form of service discovery within the cluster. Other pods can access a service using its DNS name, which resolves to the virtual IP of the service. This abstracts away the details of locating individual pods.
Internal and External Communication: Services facilitate communication between pods within the same cluster, across namespaces, and even between different clusters if properly configured. They also allow external clients to access pods through the service's external IP or DNS name.
Load Balancing: Services provide basic load balancing by distributing incoming requests across the endpoints. Depending on the service type, load balancing can occur at the ClusterIP, NodePort, or LoadBalancer level.
Labels and Selectors: Labels are used to associate services with pods. Services select pods based on label selectors, allowing you to group related pods and expose them as a service.
Session Affinity: Services can be configured to maintain session affinity (stickiness), directing requests from the same client to the same pod to maintain session state.
Service Discovery Mechanisms: Kubernetes provides two primary mechanisms for service discovery:
Environment Variables: Pods can access services' endpoints through environment variables. These variables are created automatically based on service and port names.
DNS: Kubernetes provides a DNS service that allows pods to discover other services by their DNS name.
Service Annotations: Annotations can be added to services to provide additional metadata, configuration, or instructions for tools or services that integrate with Kubernetes.
Kubernetes Services are an essential tool for enabling communication and connectivity within your cluster. They allow for decoupling of services and pods, dynamic scaling, and easy integration with external load balancers. Understanding and effectively using services is a key aspect of building and managing applications in Kubernetes.
Certainly! Let's break down the types of Services in Kubernetes in an easy-to-understand way:
ClusterIP: Imagine you have a bunch of pods working together as a team inside a clubhouse. The clubhouse has a special door (IP address) that only club members (other pods in the cluster) can use to enter. This type of Service is called ClusterIP. It provides a door inside the cluster for the pods to talk to each other.
NodePort: Now, let's say you want to invite people from outside the clubhouse to join the fun. You can open a door (port) on each side of the clubhouse (nodes in the cluster) and give everyone the same invitation. People can come in through any door, and the clubhouse knows how to redirect them to the right spot inside. This type of Service is like a party where everyone comes through the same set of doors on different sides of the clubhouse.
LoadBalancer: Imagine your clubhouse gets really popular, and you need someone to manage the crowd. You hire a bouncer (LoadBalancer) who stands at the entrance and lets people in one by one, making sure the clubhouse doesn't get too crowded. This type of Service is like a superstar event where a professional bouncer manages the entrance and evenly distributes the guests to different doors.
ExternalName: Sometimes, your clubhouse wants to invite people to an event happening outside. Instead of giving them directions to your place, you give them the address of another cool spot (external service). You provide a direct link to the other place, and everyone can join the fun there. This type of Service is like hosting an event at a different location and sharing its name with your guests.
Headless: Consider your clubhouse again, but this time, each person wants a private meeting with a specific team member (pod). Instead of going through the main entrance, each person knows exactly where to find the team member's room. This type of Service is like everyone directly knocking on the doors of specific team members inside the clubhouse.
These different types of Services in Kubernetes provide creative ways to control how pods communicate with each other and the outside world. Just like organizing events, you can choose the right Service type based on your needs, whether it's about internal communication, welcoming external guests, or sending people to special locations.
Absolutely, let's demystify selectors and endpoint discovery in Kubernetes with simple explanations:
Selectors: Imagine you have a bunch of colorful balloons, and you want to group them based on their colors. You attach labels to each balloon, indicating their color. Now, you can easily pick out balloons of a specific color by looking at their labels. In Kubernetes, selectors are like those labels. They help you group things, like pods, based on certain characteristics.
- In Kubernetes Terms: A selector is a way to pick specific pods using labels. Labels are key-value pairs that you attach to your pods. When you create a Service, you use a selector to say, "Hey, I want to group and manage all the pods with these labels!"
Endpoint Discovery: Imagine you have a bunch of friends spread out in different rooms at a party. You want to share a secret message with them. Instead of running around the party looking for each friend, you use a special announcement board that tells you where each friend is. In Kubernetes, endpoint discovery is like that announcement board. It tells you where to find the pods that belong to a certain Service.
- In Kubernetes Terms: When you create a Service, Kubernetes keeps track of all the pods that match the selector you specified. These pods are like your friends. The Service creates a list of their IP addresses and ports, which is like the announcement board. Whenever you want to talk to the Service, Kubernetes directs you to the pods using the IP addresses from the announcement board.
In a nutshell, selectors help you organize and pick pods based on labels, just like labels on balloons. Endpoint discovery guides you to the right pods by maintaining a list of their IP addresses and ports, just like an announcement board at a party. These concepts work together to simplify how pods communicate in your Kubernetes cluster.
Sure, let's demystify service discovery in Kubernetes with a simple explanation:
Service Discovery: Imagine you're at a huge shopping mall with many different shops. You want to find a specific shop, but you don't know where it is. Luckily, there's a map with clear signs that tell you which way to go. You follow the signs, and they lead you right to the shop you're looking for.
In the same way, service discovery in Kubernetes is like that map with signs. In a Kubernetes cluster, there are many pods doing different jobs, just like shops in a mall. When one pod wants to talk to another pod (let's call it "Pod A" and "Pod B"), it doesn't need to know exactly where Pod B is located. Instead, it uses the service discovery mechanism.
- In Kubernetes Terms: Service discovery is the process that helps pods find each other without needing to know specific IP addresses or locations. When you create a Service in Kubernetes, it gets a special name and IP address. Other pods can use this name to connect to the Service, and Kubernetes automatically directs the traffic to the right pods that are part of that Service.
So, just like the signs in the mall guide you to the right shop, service discovery in Kubernetes guides pods to communicate with each other using the Service's name. It makes it much easier for pods to connect and work together, even if they're distributed across the cluster.
Kubernetes Ingress:
Kubernetes Ingress is an API resource that manages external access to services within a Kubernetes cluster. It provides a way to define how incoming HTTP and HTTPS traffic should be routed to services based on rules you specify. In other words, it acts as a layer of configuration for handling incoming web traffic, allowing you to set up advanced routing, load balancing, and SSL termination for your applications.
Key features and concepts of Kubernetes Ingress:
Routing Based on Rules: Ingress allows you to define rules that determine how incoming requests should be directed to different services or backend paths based on URL patterns or domain names.
Path-Based Routing: You can route requests to different services based on the URL path requested by the client. This is particularly useful when you have multiple services running behind a single external IP.
Host-Based Routing: Ingress supports routing traffic to different services based on the domain name requested by the client. This allows you to host multiple applications on the same IP but different domains.
SSL Termination: Ingress can handle SSL termination, decrypting incoming HTTPS traffic and forwarding it to the appropriate service over HTTP.
Load Balancing: Ingress controllers can distribute incoming traffic among multiple pods associated with a service, helping to balance the load and ensure high availability.
Rewrites and Redirects: You can configure Ingress to rewrite URLs or perform redirects for certain paths, which is useful for handling changes in application structure or moving resources.
Backend Service Configuration: Ingress allows you to define backend services for each route, specifying the service, port, and any service-specific configurations.
TLS/SSL Support: Ingress supports secure communication by allowing you to configure SSL certificates for your services, ensuring that traffic is encrypted.
To use Ingress effectively, you typically need an Ingress controller, which is a software component responsible for implementing the Ingress rules and handling the traffic. There are various Ingress controllers available, such as Nginx Ingress Controller, Traefik, and others, each with its own features and capabilities.
In summary, Kubernetes Ingress is a powerful way to manage external access to services within your cluster, providing flexible routing, load balancing, and SSL termination capabilities. It's particularly useful for exposing HTTP and HTTPS services to the outside world in a controlled and configurable manner.
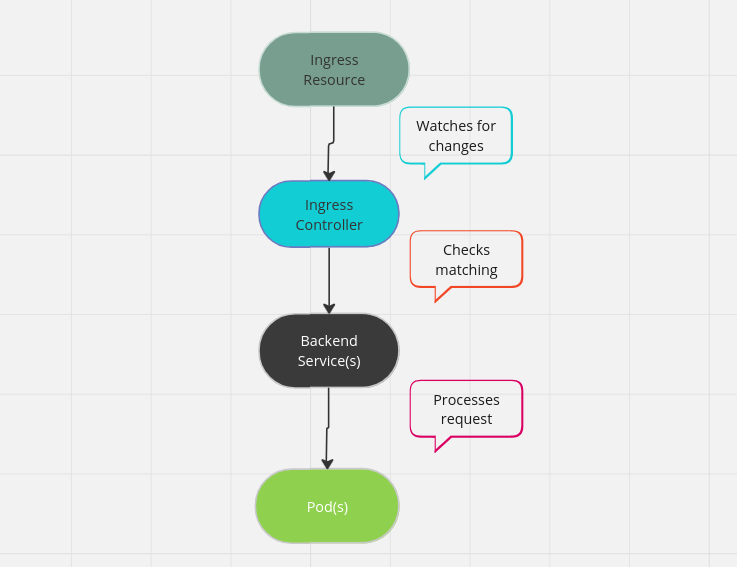
let's break down how Kubernetes Ingress works step by step:
Ingress Resource Creation: You start by creating an Ingress resource. This is like creating a set of instructions for how incoming traffic should be managed and routed.
Ingress Controller Setup: You need an Ingress Controller to make the Ingress resource work. This is a specialized software component that reads the Ingress resource and acts on its rules.
Traffic Enters Cluster: External traffic, such as HTTP or HTTPS requests from clients, enters the Kubernetes cluster.
Ingress Controller Observes: The Ingress Controller constantly watches for changes in Ingress resources. When it sees a new or updated Ingress resource, it reacts accordingly.
Matching Rules: The Ingress Controller looks at the rules defined in the Ingress resource. It checks things like URL paths or domain names to see which rule matches the incoming traffic.
Backend Service Selection: Once a rule is matched, the Ingress Controller identifies the backend service (or services) associated with that rule. This is where the incoming traffic will be directed.
Load Balancing: If there are multiple pods for a backend service, the Ingress Controller might use load balancing to distribute the incoming traffic across those pods.
HTTP(S) Handling: If the Ingress resource requires SSL termination, the Ingress Controller decrypts incoming HTTPS traffic and forwards it to the backend service as plain HTTP.
Traffic Forwarding: The Ingress Controller forwards the incoming traffic to the selected backend service's pods.
Service Communication: Within the cluster, the backend service's pods handle the request just like any other internal communication. They process the request and generate a response.
Response Back: The backend service's pods send the response back to the Ingress Controller.
Client Receives Response: The Ingress Controller sends the response to the original client that initiated the request.
In summary, Kubernetes Ingress works by creating a set of rules in an Ingress resource that defines how incoming traffic should be managed. An Ingress Controller constantly monitors these rules and uses them to route traffic to the appropriate backend services within the cluster. This allows you to manage external access to your services in a controlled and configurable way.
An Ingress Controller in Kubernetes is a specialized software component responsible for implementing the rules defined in Ingress resources. It manages and routes external traffic to services within the cluster based on the configuration specified in the Ingress objects. In other words, an Ingress Controller makes the Ingress resources actually work by handling the incoming traffic and directing it to the appropriate backend services.
Here's a breakdown of what an Ingress Controller does and why it's important:
1. Implementing Ingress Rules: An Ingress Controller reads the rules defined in Ingress resources and translates them into configuration changes that manage how external traffic is routed to services inside the cluster.
2. Load Balancing and Routing: Ingress Controllers handle load balancing by distributing incoming traffic across multiple pods associated with a service, ensuring efficient resource utilization and high availability.
3. SSL Termination: If SSL termination is required, the Ingress Controller handles the decryption of incoming HTTPS traffic, forwarding it as plain HTTP to the backend services.
4. Layer 7 Features: Ingress Controllers operate at the application layer (HTTP/HTTPS), making them capable of advanced routing decisions based on URL paths, domain names, and more.
5. Integration with External Load Balancers: Some Ingress Controllers can integrate with cloud provider load balancers to optimize external traffic routing and manage scaling based on demand.
6. Security Features: Advanced Ingress Controllers can offer security features such as Web Application Firewall (WAF) capabilities to protect against common attacks.
7. Flexibility and Customization: Different Ingress Controllers provide different features and options, allowing you to choose one that best fits your application's requirements.
Common Ingress Controller implementations include Nginx Ingress Controller, Traefik, HAProxy Ingress, and more. Each of these controllers has its own set of features, capabilities, and configuration options. It's important to choose an Ingress Controller that aligns with your application's needs and the complexity of your routing requirements.
In summary, an Ingress Controller is a crucial component that bridges the gap between Kubernetes Ingress resources and the actual routing and management of external traffic to your services within the cluster. It helps you achieve advanced routing, load balancing, SSL termination, and other capabilities, enhancing the way your applications are exposed to the outside world.
Certainly! In the context of Kubernetes, "AAA" refers to Authentication, Authorization, and Admission Control, which are essential security and access control mechanisms. Here's a breakdown of each of these components:
Authentication: Authentication is the process of verifying the identity of a user or entity trying to access a Kubernetes cluster. It ensures that only authorized users are granted access. Kubernetes supports various authentication mechanisms, including client certificates, bearer tokens, and OpenID Connect.
Client Certificates: Users present certificates signed by a trusted certificate authority to prove their identity.
Bearer Tokens: Users provide a token that is validated by the Kubernetes API server.
OpenID Connect: An identity layer built on top of OAuth 2.0, enabling secure authentication with external identity providers.
Authorization: Authorization determines what actions a user or entity is allowed to perform within the Kubernetes cluster after successful authentication. It enforces policies that restrict or grant access to resources based on roles and permissions.
RBAC (Role-Based Access Control): Kubernetes uses RBAC to define roles and role bindings that determine what actions users can perform on resources.
ABAC (Attribute-Based Access Control): Allows access decisions based on attributes of the user, such as user's department or team.
Webhooks: Kubernetes can use external authorization webhooks to make access decisions based on custom logic.
Admission Control: Admission control is a set of checks and validations that occur before an object is persisted to the Kubernetes cluster. It ensures that objects conform to certain policies and security requirements before they are created or modified.
Validating Admission Controllers: These controllers check whether the submitted object complies with a set of predefined rules.
Mutating Admission Controllers: These controllers can modify the submitted object, such as automatically injecting certain labels or annotations.
Together, Authentication, Authorization, and Admission Control ensure the security and integrity of a Kubernetes cluster. They ensure that only legitimate users and entities can access the cluster, and that their actions are restricted or permitted based on well-defined policies. These mechanisms play a vital role in maintaining a secure and controlled Kubernetes environment.
RBAC stands for Role-Based Access Control, and it's a fundamental security mechanism in Kubernetes that controls who can access and perform actions on various resources within a cluster. RBAC allows you to define fine-grained access permissions based on roles and role bindings.
Here's how RBAC works in Kubernetes:
Roles: A Role is a set of permissions that define what actions (verbs) are allowed on specific resources (API objects). For example, you can define a Role that allows a user to list and read pods but doesn't allow them to create or delete pods.
Role Bindings: A RoleBinding associates a Role with one or more users, groups, or service accounts. It determines who has the permissions defined in the associated Role. For instance, you can create a RoleBinding that grants a developer the permissions defined in a Role called "developer-role."
Cluster Roles and Cluster Role Bindings: Similar to Roles and RoleBindings, Cluster Roles and Cluster RoleBindings work at the cluster level, allowing you to define permissions across the entire cluster rather than within a namespace.
Subjects: Subjects are entities that can be assigned roles or cluster roles. Subjects can be users, groups, or service accounts. For example, a user named "Alice" can be a subject.
Verbs and Resources: Permissions are defined using verbs (actions) and resources (API objects). Verbs include actions like "get," "list," "create," "delete," etc. Resources are the Kubernetes API objects such as "pods," "services," "deployments," etc.
By defining Roles and RoleBindings, you can control access at a granular level. For instance, you might have different Roles for administrators, developers, and viewers, each with varying levels of access to different resources. RBAC ensures that users and applications only have the permissions required for their specific tasks, improving security and reducing the risk of unauthorized actions.
Here's an example of what a Role and RoleBinding might look like:
# Define a Role that allows reading pods and services in the "default" namespace.
apiVersion: rbac.authorization.k8s.io/v1
kind: Role
metadata:
  namespace: default
  name: pod-reader
rules:
- apiGroups: [""]
  resources: ["pods", "services"]
  verbs: ["get", "list"]

# Associate the Role with a user or group using a RoleBinding.
apiVersion: rbac.authorization.k8s.io/v1
kind: RoleBinding
metadata:
  name: read-pods-binding
  namespace: default
subjects:
- kind: User
  name: alice
  apiGroup: rbac.authorization.k8s.io
roleRef:
  kind: Role
  name: pod-reader
  apiGroup: rbac.authorization.k8s.io
In this example, the "pod-reader" Role allows the subject (user "alice") to get and list pods and services in the "default" namespace. The "read-pods-binding" RoleBinding associates the Role with the user "alice."
RBAC is a powerful mechanism that helps ensure the security and proper management of Kubernetes resources within a cluster.
Certainly, let's dive into Kubernetes Custom Resources and Custom Controllers in detail:
Kubernetes Custom Resources:
Custom Resources allow you to extend Kubernetes by defining your own API objects with custom fields and behaviors. They enable you to introduce new abstractions and concepts tailored to your application's needs.
Creating Custom Resources: To create a Custom Resource, you define a Custom Resource Definition (CRD), which specifies the structure, fields, and behavior of your new resource type. This is done using YAML files.
API Group and Version: Custom Resources have their own API group and version, just like built-in Kubernetes resources. For example, you might have
mydomain.com/v1for your Custom Resource.Spec and Status: Custom Resources consist of two primary sections:
spec(desired state) andstatus(current state). You define what you want in thespecand the controller updates thestatus.Use Cases: Custom Resources are useful for encapsulating application-specific logic and data. Examples include databases, message queues, specialized networking, and application-specific configurations.
Custom Controllers:
Custom Controllers are software components that monitor Custom Resources and perform actions based on changes to these resources. They automate operations and manage the lifecycle of your custom application logic.
Controller Basics: A Custom Controller watches for changes to Custom Resources and responds by taking actions, such as creating pods, modifying configurations, or interacting with external systems.
Reconciliation Loop: Custom Controllers follow a reconciliation loop:
List the Custom Resources.
Compare the actual state (status) with the desired state (spec) defined in the Custom Resources.
Take actions to align the actual state with the desired state.
Operators: Custom Controllers are often referred to as "Operators." An Operator is a specific kind of Custom Controller that focuses on automating complex application management tasks.
Use Cases: Custom Controllers are used to manage your Custom Resources and ensure that the state of your application matches what's defined in the Custom Resources. They can automate deployment, scaling, updating, and deletion of resources.
Example Scenario: Let's say you're building a game platform. You create a Custom Resource called Game using a CRD. The Game Custom Resource could have fields like players, status, and game-type. You also build a Custom Controller (Operator) that monitors Game resources. When a new Game is created, the Controller creates the necessary pods, services, and configurations to launch the game server, and updates the status to reflect the deployment progress.
In summary, Kubernetes Custom Resources and Custom Controllers empower you to extend Kubernetes with your own domain-specific abstractions and automate complex application-specific tasks. This flexibility allows you to model and manage your application's unique requirements effectively.
Kubernetes Operators are a powerful concept introduced by CoreOS (now part of Red Hat) that enable you to automate the management and operation of applications and services on Kubernetes clusters. Operators extend Kubernetes' declarative model to handle complex, stateful applications by encapsulating operational knowledge into the cluster.
- Custom Resource Definitions (CRDs) in Kubernetes are a way to extend the Kubernetes API and create your own custom resources. CRDs allow you to define new object types with their own fields, behaviors, and validation rules, beyond the built-in resources provided by Kubernetes. This enables you to model and manage application-specific resources using Kubernetes' powerful orchestration and management capabilities.
Why Use CRDs:
CRDs are valuable when the standard Kubernetes resources (like Pods, Deployments, Services, etc.) do not fully capture the specifics of your application or domain. By creating Custom Resources using CRDs, you can define your own abstractions and controllers that interact with these resources.
Here's everything you need to know about Kubernetes Operators:
What is a Kubernetes Operator?
A Kubernetes Operator is a method of packaging, deploying, and managing a Kubernetes application. It uses custom resources and controllers to automate the management of complex applications, making them more manageable and scalable.
Custom Resources (CRs):
Operators define Custom Resource Definitions (CRDs), which extend the Kubernetes API to create new resource types. These resources represent the application or service you want to manage using an Operator.
Controllers:
Operators use custom controllers that monitor and react to changes in the Custom Resources. These controllers reconcile the desired state of the application with the current state to ensure that the application remains in the desired state.
Operator Frameworks:
Several frameworks and SDKs are available to help you build Kubernetes Operators more easily, including the Operator SDK and the Kubernetes Universal Declarative Operator (KUDO).
Use Cases for Operators:
Operators are particularly useful for managing complex, stateful applications that require more than just deploying containers. Examples include databases (MySQL, PostgreSQL), message queues (Apache Kafka), monitoring systems (Prometheus), and more.
Key Concepts:
Custom Resource Definitions (CRDs): Extend Kubernetes' API with new resource types.
Controller: Watches CRs and ensures the actual state matches the desired state.
Reconciliation: The process of bringing the actual state of resources in line with the desired state.
Finalizers: Mechanism to perform cleanup tasks before a resource is deleted.
Status Subresource: Allows Operators to provide additional information about the state of their resources.
Operator Lifecycle:
Install: Deploy the Operator into your Kubernetes cluster.
Custom Resource Creation: Create instances of the Custom Resources defined by the Operator.
Controller Reconciliation: The Operator controller ensures that the actual state matches the desired state.
Upgrade and Scaling: Operators can manage upgrades and scaling of applications.
Backup and Restore: Some Operators provide mechanisms for data backup and restore.
Operator Hub:
The Operator Hub is a repository of pre-built Operators that you can use and customize for various applications. It's a community-driven effort to share and discover Operators.
Benefits of Operators:
Automation: Reduce the manual tasks required to manage complex applications.
Consistency: Ensure applications are deployed and managed consistently.
Scalability: Easily scale and manage applications as needed.
Upgrades: Operators can handle application upgrades seamlessly.
Self-Healing: Operators can automatically handle failure scenarios.
Challenges:
Designing and developing a well-functioning Operator requires understanding of both Kubernetes and the application domain.
Creating a reliable and comprehensive Operator might take time and effort.
In summary, Kubernetes Operators are a way to automate the management of complex applications in Kubernetes by extending its declarative model. They help you streamline deployment, scaling, and management tasks while providing a consistent and reliable way to handle various application types.
ConfigMaps:
ConfigMaps are Kubernetes resources used to store configuration data in key-value pairs. They are typically used for non-sensitive configuration information that your application needs. Common use cases include storing environment variables, configuration files, or any data that needs to be passed to a containerized application.
Secrets:
Secrets, as the name suggests, are used to store sensitive information such as passwords, API tokens, and certificates. They provide a more secure way to handle confidential data compared to ConfigMaps. Secrets are stored in an encrypted format in etcd (Kubernetes' key-value store) and are only accessible to pods in the same namespace.


